Disclosure: Some of the links are ‘affiliate links.' This means if you click on the link and purchase a product, I will receive a commission. There is no additional cost to you!
We’re going to talk about connected site tags and when this feature is applicable as you’re installing Google Analytics for your web property. There seems to be a lot of confusion around this and how to configure it to work properly.
Connected site tags saves you from having to add the tag manually to your web pages. It’ll only work if your site is tagged with gtag.js. If you want to use connected site tags, you’ll go through one of three scenarios.
The first one is you’ll check your website to see if it’s running gtag.js.
The second scenario is if your website is running analytics.js, then you’ll have to replace that code. Under a proper implementation, you should be running either one or the other, either analytics.js or gtag.js.
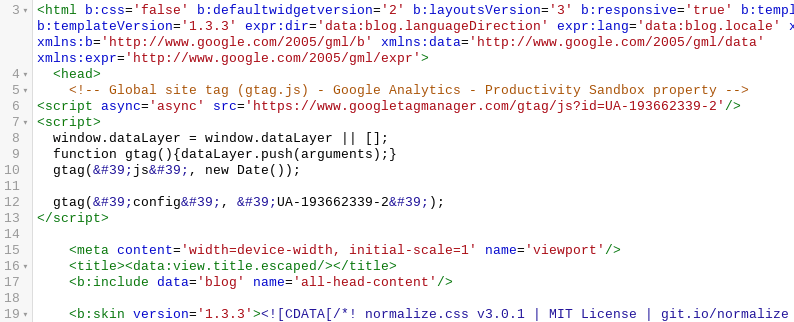
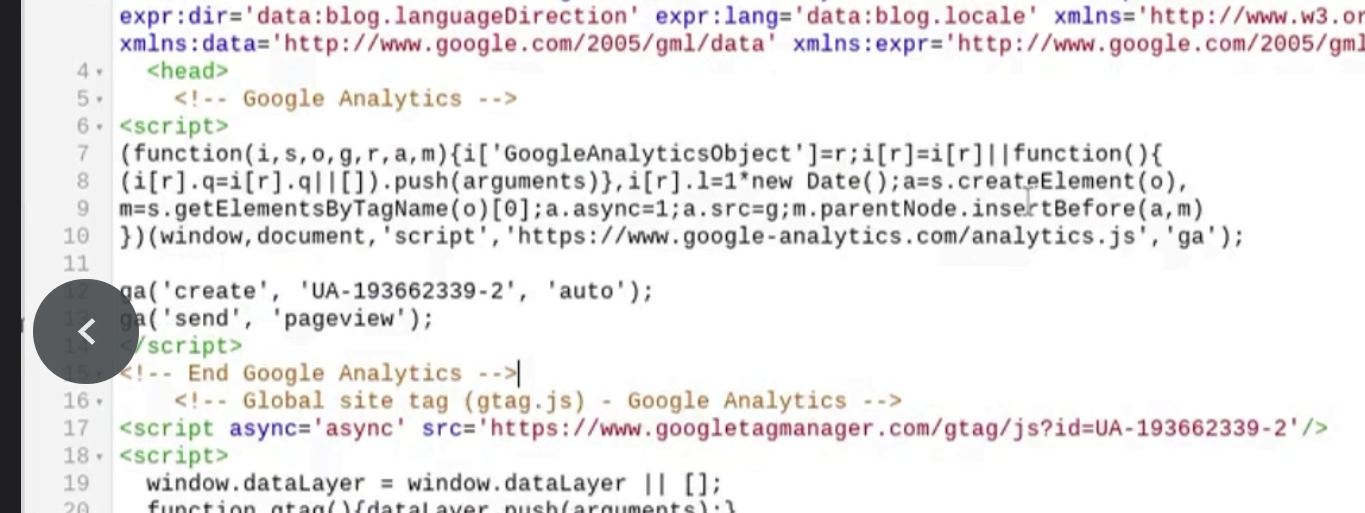
You can tell the difference when you look at the analytics.js code snippet. You’ll find a call to the file here to that analytics.js file and in gtag.js. There’s a comment indicating that it’s the gtag.js code. You can also see the file that it calls is gtag.js in that URL.
The third scenario is if you don’t have any tracking, you don’t have any Google Analytics tags–no analytics.js nor any gtag.js code snippet. When you’re setting up a new Google Analytics account or a Google Analytics property, what you’ll do is you’ll grab the code from the tagging instructions, and copy and paste it into your website code.
We’ll go through each of these scenarios in detail. If your Universal Analytics property uses analytics.js, Google Tag Manager, or if you input your Universal Analytics property ID in a field of your CMS, that is your WordPress, Drupal, Squarespace, Shopify, Wix, Weebly, or any other CMS, then it won’t work. That’s why if you tried connecting the site tags in the Google Analytics admin section, it wouldn’t show up in real-time reporting nor in any other of your reports.
Scenario 1: Connected Site Tags with Existing GA UA Property Using gtag.js
This first method is very simple and very straightforward. Look to see if our website is running gtag.js in your Google Analytics. Go to your admin section and this is an easy way to see if your website is set up properly for connected site tags without actually going into the code.
Once you’re in this admin section under the property column, click on Google Analytics 4 setup assistant and it’ll walk you through this wizard to set up your Google Analytics 4 property.
What you’ll do is choose the first option, I want to create a new Google Analytics 4 property based on this Universal Analytics property. Click on Get Started and the wizard will give you a few bullet points concerning what you’ll accomplish when you go through the wizard.
That includes creating a new Google Analytics 4 property, copying basic settings from your Universal Analytics property, and activating enhanced measurement. The last point says it’ll also enable data collection using your existing tags and this is the connected site tags configuration.
If you don’t have this option available, if it’s grayed out then there are a couple things that you might consider as a couple reasons why it’s not enabled for you. One is you’re not using gtag.js. You’re using some other method to track to install Google Analytics, which is fine. You’ll just have to use another method for connected site tags. Or you’re using a website builder, a CMS, or Google Tag Manager.
If you have the option available, click Create Property. If you want to take a look under the hood, take a look at the code yourself to see how this works, here’s what to look for. Look at your HTML code and find your gtag.js code snippet, which should be in the head tag.
It probably includes a comment indicating that it uses gtag and you can see gtag in the URL it calls. You’ll also see a line indicating that the tag is controlled by your Universal Analytics property ID.
The gtag.js code snippet must be controlled by the Universal Analytics property you want to connect to Google Analytics 4.
Here’s another scenario. Let’s say you have an existing Google Analytics 4 property but this site is not tagged to measure traffic for that property. If we go back to our Google Analytics 4 property, the property that does not have the website you want to add, and we want to add this website to that Google Analytics 4 property, what we’ll do is we’ll go to the admin section.
If we’re in the setup assistant you can either click on Tag Installation, or you can also click right to Data Streams. Click on that web stream details.
Go back to the code. What we’ll do is copy this line of code and paste another one underneath it. Look in the web stream details and copy the measurement ID. We’ll go back to the code and here we’ll replace Universal Analytics property ID with the measurement ID we just copied.
This will help us with the connected site tag to send data to both your Universal Analytics property and your Google Analytics 4 property.
Instead of pasting in this line of code, another option is to go to your Universal Analytics property and add the Google Analytics measurement ID to the connected property.
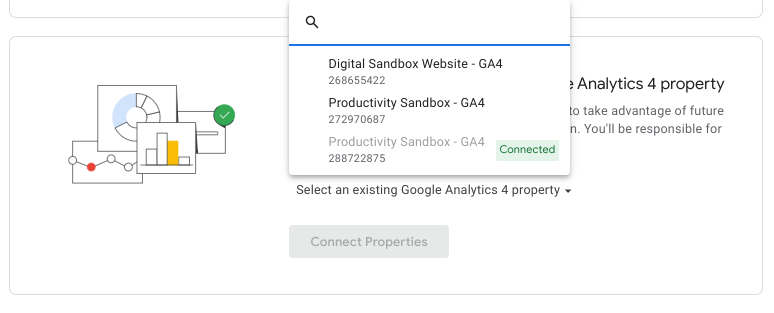
Let’s go to tracking info click on tracking code click on connected site tag and paste the measurement ID for the tag and connect. Click on Google Analytics 4 Setup Assistant and this time instead of creating a new Google Analytics 4 property. Choose, I want to connect to an existing Google Analytics 4 property, so click the drop down and choose the property ID. Click on Connect Properties.
Scenario 2: Connected Site Tags by Migrating From analytics.js to gtag.js
Let’s go on to the second scenario where your website is using analytics.js to track for Google Analytics. Again, as we mentioned earlier, the way that you can tell your website is using analytics.js is that the code snippet calls the analytics.js file. It also uses these trackers for pageview and for the Universal Analytics property ID. Remove this code and use the gtag.js code from the previous scenario.
You can obtain this code by going to your Universal Analytics property and going to the tracking code. Copy this code snippet to paste it into your code. Once you do that you can use any of the methods that were mentioned in the first scenario, so make sure you review all the details and configure the settings that we covered.
Change any analytics.js code for tracking pageviews, events, custom dimensions and metrics, and any other elements that you’re sending to Google Analytics to the equivalent gtag.js code.
Take a look at the documentation from Google. It’ll give you examples that you can reference. This way you can ensure that all the data you’re tracking will continue to report in Google Analytics now we’re going to cover.
Scenario 3: Connected Site Tags by Creating New Google Analytics Account & Properties
The last scenario is where you don’t have any Google Analytics tracking and you’re setting up a brand new Google Analytics account. Navigate to analytics.google.com or search for Google Analytics, and it should appear as the first result.
If you don’t have an account already, click on Start Measuring and begin to create your account. If you already have access to a Google Analytics account, go to admin and click on create account.
When you create your account, keep in mind that your Google Analytics account could potentially encompass multiple web properties. For example, your account name could be your organization and within your organization’s account, you could create Google Analytics properties for your website, a subdomain, a mobile app, or so on and so forth.
We’ll give this a name and take a look at the settings to figure out which one you want to enable. Click next and set up the Google Analytics 4 property. Give the property a name and set the correct time zone.
Then, you’re going to click on Show Advanced Options. This is where we’ll enable the Universal Analytics property. Slide the toggle over to the right so that it turns blue select your http prefix. Input your website URL and make sure the options to create both a Google Analytics 4 property and an Universal Analytics property are selected. We want this enhanced measurement for Google Analytics 4 property enabled because that’ll automatically set up tracking such as link clicks, embedded videos, as well as a few other events.
Click on next and you can choose to input this business information but it’s optional. Click on create and it’ll bring us to the terms of service, which we’ll have to accept in order to proceed.
Instead of creating a reporting view like you did with Universal Analytics, we’re brought to this screen with web stream details. We have the URL, the name, and measurement ID at the top. There’s the stream ID, the status, and then the section for enhanced measurement. This is the same enhanced measurement that we were talking about earlier when we first created our account and property.
In the next section with tagging instructions, add the analytics tag directly to your site. Click on global site tag, copy the code that appears and go to your HTML. Find the opening head tag and paste the code that you copied.
Since we elected to create both a Google Analytics 4 property and a Universal Analytics property, Google should have created a connected tag for this Google Analytics 4 property. If we click on the connected site tags, we see this Universal Analytics tracking ID.
What we can do just to make sure is copy this UI tracking ID and just check that against the tracking ID created.
Testing/Validating Connected Site Tags
Now, we can test our tracking. Load your website and then go back to the real-time reports. First, we’ll check the Google Analytics 4 property and then check the Universal Analytics property. When you see the hits in both properties, then your tracking is good to go.
If you’re looking for Google Analytics support, take a look at the help available at Fiverr.
AUTHOR: Isaiah Stone
Isaiah Stone is a digital analyst in the consumer goods industry. He is fascinated with productivity, business growth, and accomplishing more.


![Why the Landing Page Report is Key & Where to Find it in Google Analytics 4 [VIDEO]](https://growthlearner.com/wp-content/uploads/2021/08/GA4-Landing-Page-Report-440x264.png)
